
swap space in (CentOS and Ubuntu) server
Swap Space In (CentOS&Ubuntu) Server
Introduction
Linux users are usually aware of swap space, but it is often a source of misunderstanding. Now we are going to learn how to add swap space in both CentOS and Ubuntu Servers. In this article, We will also look at One of the easiest ways of increasing the responsiveness of your server and guarding against out-of-memory errors in applications is to add some swap space. After completing this section you should be able to create and manage swap space to supplement physical memory.
What is Swap Space in the Server
Computer systems have a finite amount of physical memory that Is made available to the operating system. But most of the time requires more, so we need to add swap space on the disk. Swap space in Linux is used when the amount of physical memory (RAM) is full. If the system needs more memory resources and the RAM is full, inactive pages in memory are moved to the swap space. While it can help machines with a small amount of RAM, it should not be considered a replacement for more RAM. Swap space is located on hard drives, which have a slower access time than physical memory.
Types of Swap Space in the server
Swap Partition – This is the default type of swap memory which is in fact, a hard drive partition that is dedicated to swapping.
Swap File – This is a self-created type of swap memory. Whenever there is no sufficient amount of space left in the hard drive to create a swap partition, a swap file is manually created for swapping the inactive contents of RAM into it.
Importance of swap space in the server
Hibernation
The hibernation functionality is useful on desktop systems. It saves the current system state from RAM to disk before shutting it down. The next time the system starts, the saved state will be restored to RAM, allowing us to continue where we left off. Linux uses the swap space when suspending to disk. if we want to hibernate, it needs a swap partition or files the size of our RAM or bigger.
Free Unused RAM for More Disk Buffers
Linux always tries to use RAM as much as possible. Because RAM is much faster than any other storage, even the fastest drives. If a file is cached in memory, The associated process will run much faster. The action of caching files when accessing them the first time is called disk buffering.
Anonymous Memory
There is another type of memory called anonymous memory. This memory is requested by processes but not backed by a file on disk. Among those anonymous pages, some are memory used only once during startup. Thus, if we enable swapping they no longer waste. This Table contains The data based on The recommended swap space depending on the RAM size.
Low Memory Issues
Another advantage is that swapping gives admins time to react to low memory issues. We will often notice the server acting slowly and upon login will notice heavy swapping. Without swapping running out of memory can create much more sudden and severe chain reactions. So usually, I would advise setting swap space to about the size of your largest process.
Recommended Sizes in Server
This Table contains The data based on The recommended swap space depending on the RAM size. The main consideration is that as the number of RAM increases, adding more swap space simply leads to thrashing well before the swap space comes close to being filled. If you have too little virtual memory, you should add more RAM, if possible, rather than more swap space.
| RAM | SWAP SPACE | HIBERNATION |
| 2 GiB | 2 x RAM | 3 x RAM |
| 2 GiB – 8 GiB | same as the ram | 2 X RAM |
| 8 GiB – 64 GiB | at least 4 GiB | 1.5 X RAM |
| more than 64 GiB | at least 4 GiB | not recommended |
The system hibernation function uses the swap space to save the RAM contents before powering off the system. But when you turn the system on, the kernel restores the RAM contents from the swap space and does not need a complete boot for those systems. So The space needs to be greater than the amount of RAM.
How to check swap space in (CentOS&Ubuntu) server
Top 5 Commands to check swap space in (Centos&ubuntu) server
free
swapon
/proc/swaps
vmstat
top
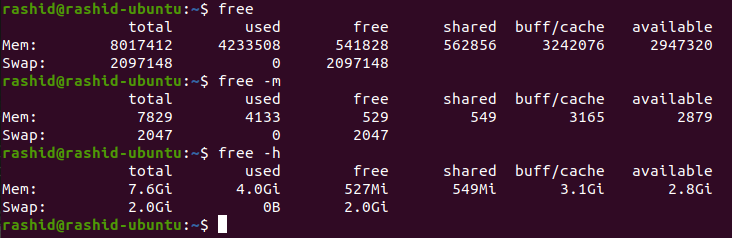
free
Free command is used to check memory and swapping utilization on your system in a few lines. Without the usage of any option, it will show in KB. Using the -M option shown in MB and -H option will show human-readable format.
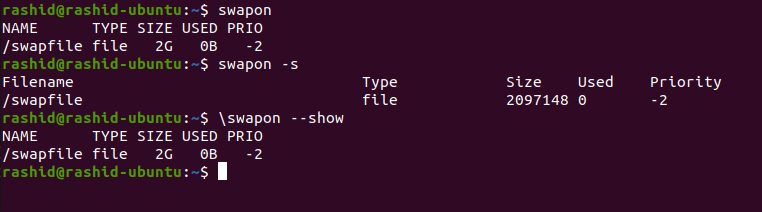
swapon
You can use the swapon command to check swap space on a particular partition, logical volume, or file. Here, we will use swap on -s (summary) or swapon –show to get swap details (in kilobytes).
/proc/swaps
You can also view the swap size information through the swap configuration file /proc/swaps. It also displays device swap information so that you can see the device name, partition, logical volume or file, type and how much swap it contributes to the system.

Vmstat
Through the vmstat command, you can view the swap-in and swap-out information. However, you can not see the total values of the swap as seen in the previously mentioned commands.

Top or htop
The header section of the top command output shows the swapping information, in kilobytes. Other commands that give this information include htop, glances, and itop, etc.


How to add swap space in (CentOS&Ubuntu) server

Traditionally, swap space is used as a separate partition on the disk. When you install Linux, you create a separate partition just for swapping. But this trend has changed in recent years. With swap files, you don’t need a separate partition anymore. You create a file under root and Also tell your system to use it as the swap space.
With dedicated swap partitions, resizing the swap space is a difficult task in many cases. But with swap files, you can resize them as you like.
Step 1 – Checking the System for Swap Information
#swapon -s or swapon –show
If you don’t see any output, that means your system doesn’t have swapping available currently.
#free -h
Step 2: Checking Available Space on the Partition
#df -h
Step 3: Login as root user
# sudo su
Password: Enter your system password here.
Step 4: Creating a Swap File
#dd if=/dev/zero of=/swapfile bs=1024 count=524288
Replace the value of ‘bs‘ and ‘count‘ according to your requirement.
if=/dev/zero : Read from /dev/zero file. /dev/zero is a special file that provides as many null characters to build a storage file called /swapfile.
of=/swapfile : Read from /dev/zero write storage file to /swapfile.
bs – sets of blocksize
Count – number of blocks
Or
We can also use fallocate command to create a file
#fallocate -l 1G /swapfile
Sample output:-

524288+0 records in
524288+0 records out
536870912 bytes (537 MB) copied, 3.23347 s, 166 MB/s
Step 5: Setting up the file permission
Only the root user can write and read the swap file.So Secure the file by giving root access.
#chown root:root /swapfile
#chmod 0600 /swapfile# ls -lh /swapfile
-rw------- 1 root root 1.0G Apr 29 11:14 /swapfile
step 6: make the file as swap space
Use the mkswap utility to set up the file as Linux swap area
#mkswap /swapfile
Sample output :-
Setting up swap space version 1, size = 524284 KiB
no label, UUID=0e5e7c60-bbba-4089-a76c-2bb29c0f0839
Step 7: Enable the Swap file
The Following command makes enabling the file.
#swapon /swapfile
To verify that the procedure was successful, we can also check whether our system reports swap space now.
# swapon -s or swapon –show

Sample output :-
Filename Type Size Used Priority
/swapfile file 4194300 0 -1
#free -m
total used free shared buffers cached
Mem: 3953 315 3637 8 11 107
-/+ buffers/cache: 196 3756
Swap: 4095 0 4095
Step 8: Mount the File Permanent in Ubuntu
Our recent changes have enabled the swap file for the current session. However, if we reboot, the server will not retain the swap space settings automatically. We can change this by adding the swap file to our /etc/fstab file.
#vim /etc/fstab
Now, Add the below entry in /etc/fstab
“ /swapfile swap swap sw 0 0 “ After that Press ESC and use :wq! For saving.
Now the file is permanent system will automatically check this file on each Bootup.
How to Remove swap space in (CentOS&Ubuntu) server
If you are wish to remove the swapping in server you need to follow below steps:-
Step 1: Disable the swap file
#swapoff -v /swapfile
Step 2: Remove entry from /etc/fstab
You can remove the entry in two ways:-
put a "#" beginning of the entry like
#/swapfile swap swap defaults 0 0
OR
Manually clear the entry from here.
Step 3: Remove the actual file
#rm /swapfile
Now ,Successfully removed swapping from your system.
Swappiness
Swappiness is a property of the Linux kernel that changes the balance between swapping out runtime memory, as opposed to dropping pages from the system page cache. This is a value between 0 and 100 that represents the percentage of memory usage that will trigger the use of swap. With values close to 0, the system will not swap data to the drive unless necessary. Values that are closer to 100 will try to put more data into the swap to keep more memory free.
We can check the current Swappiness value using :
#cat /proc/sys/vm/swappiness
Sample output :- 30
The default value will be 30 in CentOS server and 60 will be in Ubuntu server.
But, Higher values increase aggressiveness and lower values decrease aggressiveness, So we can set the Swappiness to a different value by using the below mentioned command.
#sysctl vm.swappiness=Value
Or
#echo Value > /proc/sys/vm/swappiness
Now, temporarily set the Swappiness value, but we need to persist until the next reboot .Then, we have to modify the configuration file by typing:-
#vim /etc/sysctl.conf
Now, Add your Swappiness setting to the bottom of the file:
vm.swappiness = 10
After the entry in the configuration file you can save , The server will now automatically set the Swappiness to the value you declared on each boot up.
Conclusion
By the following steps in this guide, You have learned how to create a swap file and activate and configure swapping on your Linux system. Also, we have discussed Swappiness to tune your system.