
cPanel to Plesk – How to Migrate a hosting account ?
Migration from cPanel to Plesk
Plesk and cPanel have different business models and features, requiring the conversion of migrated objects during deployment on the destination server. I am referring the way to migrate a cPanel hosting account to Plesk
For example: Parked domains in cPanel converts to domain aliases in Plesk.
Some objects and settings will not migrate due to the technical limitations
For example: Encrypted FTP user’s password in cPanel will not migrate to Plesk.
Plesk generates new passwords for FTP users during the deployment process and reports them in the migration results report.
This article explains the process of migrating accounts from cPanel to Plesk control panel using the Plesk Migration & Transfer Manager tool.
Plesk’s built-in Migration Manager is available only on latest versions of Plesk like 11.0,11.5,12.0,12.5
Open the Migration & Transfer Manager in the Plesk GUI:
Tools & Settings > Migration & Transfer Manager
and click the Start New Migration button.
Step 1:
On the first step of the migration wizard, input the source server hostname (or IP address), the SSH server’s port, and the root user password. Then choose the options to migrate the whole server or to perform a selective migration.
Leave the Use rsync transport option enabled — this will improve the speed and reliability of the data transfer, as well as lower the free disk space requirements for both the source and the destination servers.
Migration Settings

You can specify the location of temporary migration data on the source (Migration & Transfer Agent upload path) and destination (Temporary Files Location) servers. If the source server hosts large databases or the Use rsync transport option has been disabled, it is recommended you to choose paths to locations with enough free disk space
Step 2:
If selective migration was selected in the previous step, the Migration & Transfer Manager wizard will present a screen with a list of accounts on the source server, each with a check-box to select.
Additionally, you can choose the options to transfer all data, mail only, or everything except mail. By default, all data will migrate.
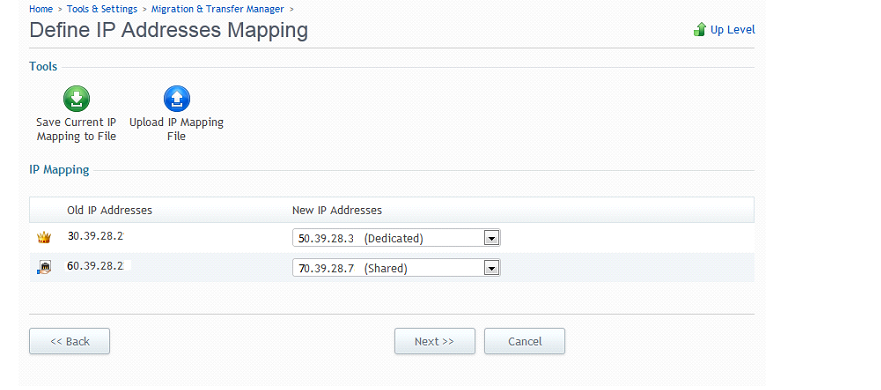
Step 3:
The next step IP address mapping allows you to choose an IP mapping scheme.(i.e. which IP addresses the domains will have on the destination server, based on the IP addresses they had on the source server)
Two or more shared IP addresses can maps to a single shared IP address on the Plesk server. But mapping of dedicated IP addresses can be done one-to-one.
IP addresses will be changed in domain’s DNS records and hosting setup during deployment.
Step 4:
After that, your migration will start. Progress can be monitored on the Migration & Transfer Manager screen. Upon completion, the Migration and Transfer Manager will report on the general status of the migration. (Completed or Completed with errors)
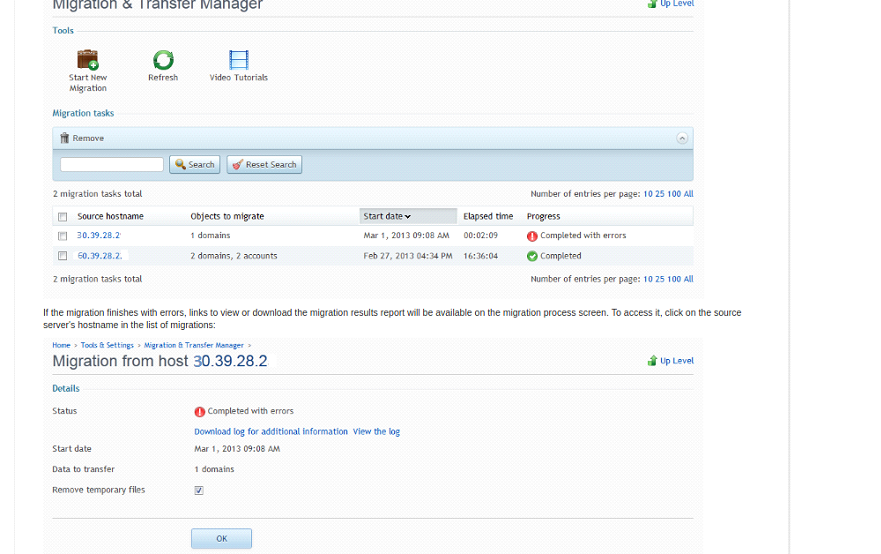
If the migration finishes with errors, links to view or download the migration results report will be available on the migration process screen. To access it, click on the source server’s hostname in the list of migrations
For migration assistance, you can contact us. Also we will manage cPanel and Plesk servers with lowest rates, you can check our cPanel Server Management for more details.