How to Install cPanel/WHM on CentOS 7
cPanel is a most popular online Linux-based web hosting control panel that provides a graphical interface and automation tools designed to simplify the process of hosting a web site. cPanel utilizes a three-tier structure that provides capabilities for administrators, resellers, and end-user website owners to control the various aspects of website and server administration through a standard web browser. In addition to the GUI, cPanel also has command line and API-based access.
It comes with a cPanel and Web Host Manager(WHM), which makes web hosting easier for web admins.
- WHM provides root and reseller level access interface, where users can manage settings related to server administration and account management.
- While cPanel offers user level access interface to manage a web hosting account on the server.
The latest cPanel version supports installation on CentOS, Red Hat Enterprise Linux (RHEL), and CloudLinux OS. Application-based support includes Apache, PHP, MySQL, PostgreSQL, Perl, and BIND (DNS). Email-based support includes POP3, IMAP, and SMTP services.
Once installed, cPanel cannot be easily removed. cPanel’s FAQ states that the best way to uninstall cPanel is by reformatting the server. Similarly, it should only be installed on a freshly installed operating system with minimal prior configuration. cPanel is accessed via port 2082 and 2083, where WHM accessed via 2086 and 2087.
Features of cPanel/WHM
- Multilingual powerful GUI interface to manage a server and client websites.
- Built-in file manager and phpMyAdmin to easily manage files and databases.
- DNS support and management for both server and client websites.
- Email management with DKIM and SPF support for authentication and encryption.
- Supports management (start/stop/enable/disable) of services on server.
- Easy integration with PhpMyAdmin manage your MySQL databases from web browser.
- Supports operations such as Backups, Migrations and restorations in a very easy and smooth manner.
- Easy SSL/TLS management for multiple domains using SNI.
- Enables you to configure SSL/TLS for all server services and client domains.
- Now offers AutoSSL supporting Proxy Subdomains.
- Supports EV Certificates.
- Supports API Authentication Tokens.
- Can be easily integrated with almost all client management and billing software like WHMCS, Blesta etc.
Important Facts
- cPanel only license publicly visible, static IP addresses. They do not license dynamic, reserved, sticky, or internal IP addresses.
- cPanel is commercial software and requires a licence to work but cPanel offers a 15 day trial, you can install your software using the trial and you can purchase the software later. The trial is automatically activated once cPanel is installed on your server.
- Only install cPanel & WHM on a freshly-installed operating system.
- cPanel do not provide an uninstaller. If you wish to remove the software, you must reformat the server.
- You must log in to the server as the root user in order to install cPanel & WHM.
- You should install a minimal version of the operating system. All services that cPanel requires will automatically be installed during the cPanel/WHM installation process. Installing services prior to the installation of cPanel/WHM will cause compatibility problems.
- cPanel does not support NAT.
- New installations of cPanel & WHM default to the fast installation mode.
- We strongly recommend a system that exceeds the minimum requirements.
Installation Requirements
- A clean fresh minimal installation of CentOS 7 server.
- 266 MHz processor (64-Bit)
- Minimum of 1 GB RAM (but 2 GB recommended).
- At least 20GB of free disk space (but 40 GB recommended).
- A Static IP address, cPanel cannot work on a dynamic IP address.
- A valid cPanel license.
- Standard hostname (FQDN or Fully Qualified Domain Name).
- Root access to your server.
- Perl installed.
- Curl installed
- Screen installed
- Firewall disabled
How long will cPanel/WHM support my chosen operating system?
- Operating System : CentOS 7.x, Red Hat Enterprise Linux 7.x, CloudLinux 7.x
- cPanel End of Life : December 31, 2024
Installation of cPanel/WHM
Before installing cPanel you must have Perl installed on your server as cPanel is written in Perl. To install Perl on your system, log in as root user and run the following command.
yum install perl -y
Now it is required to have a hostname for your server. A hostname is an FQDN or Fully Qualified Domain Name which will be used to identify your server. You need to change the hostname both in /etc/hosts, and in /etc/sysconfig/network
Open file /etc/hosts and add the below entry:
192.168.1.25 myserver.domain.com myserver
save and exit.
Open the file /etc/sysconfig/network and modify the HOSTNAME= value to match your FQDN hostname.
HOSTNAME=myserver.domain.com
save and exit.
Now, run the hostname command like below:
hostname myserver.domain.com
Restart networking on your server to ensure that changes will persist on restart.
/etc/init.d/network restart
Confirm the hostname has been set using the below command.
hostname
Once the hostname is set, let’s go ahead with cPanel installation.
cPanel Installation is a lengthy process that does take a long time. Although using the program “screen” is not necessary to install cPanel, it can be a very helpful addition to the installation process. So, first, you will need to install the screen to start the cPanel Installation, the screen will help us keep our process going, even if we lose the connectivity to the server.
To install screen and curl run the following command:
yum install curl screen -y
Once the screen is installed, we start a new session running with the name ‘cPanel Installation’. So the command is:
screen -S cPanel Installation
So Now your screen is installed, we are ready to start with our cPanel Installation.
To install cPanel & WHM on your server, run the following command:
cd /home && curl -o latest -L https://securedownloads.cpanel.net/latest && sh latest
This single command changes your session to the home directory, downloads the latest version of cPanel & WHM, and runs the installation script.
How The Auto cPanel Installer Script Works
- It examines various packages to ensure that there will be no conflicts and it finds any package conflict, it updates and uninstalls previous packages with yum cPanel on a Fresh OS.
- It also downloads language and base files for installation.
- Installs various Perl modules through CPAN and other required packages with yum.
- It downloads and compiles PHP and Apache with various associated modules.
You can now sit back and relax as the installation takes around half-hour to complete. Once the installation script is finished you need to complete the installation wizard from its web-based interface and you can access WHM with the following URL:
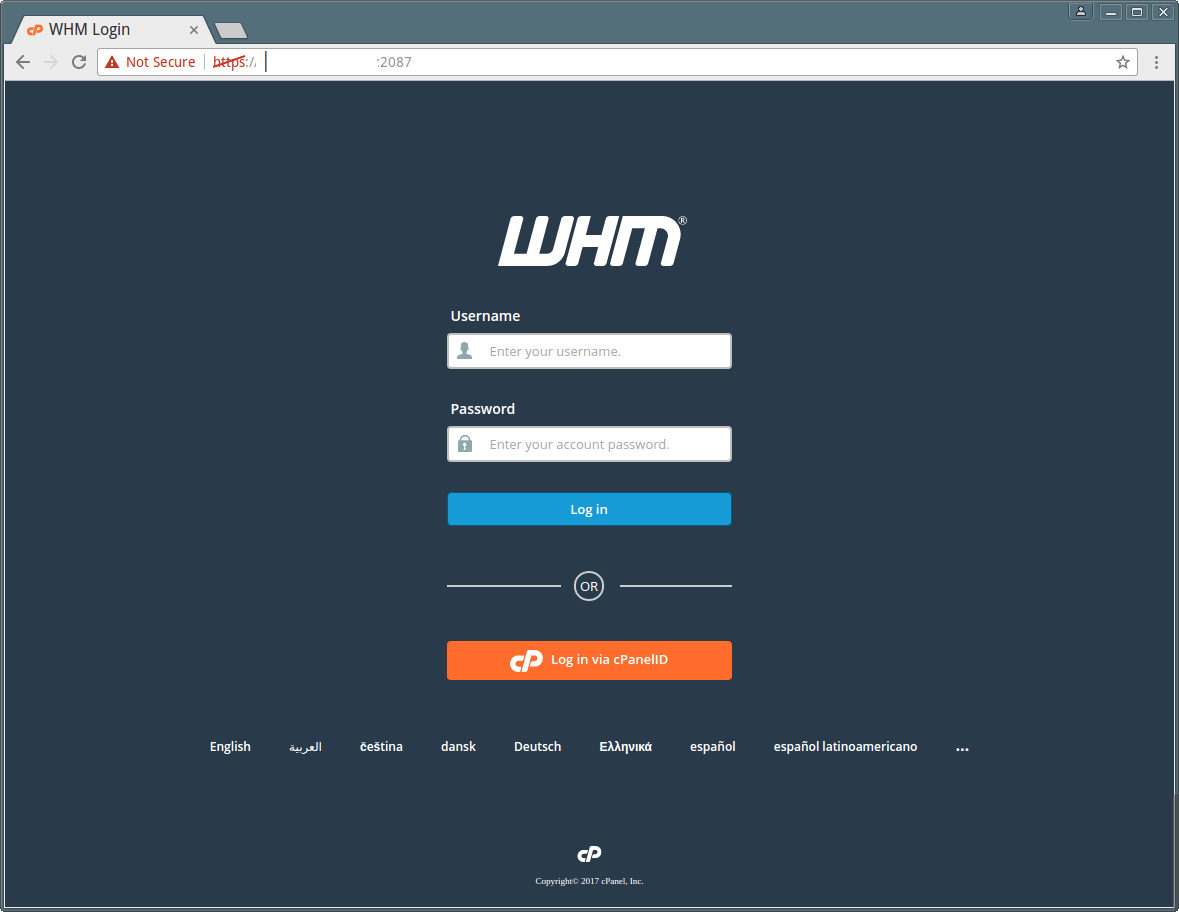
https://your-server-ip:2087
Now login with user “root” and your password. There are some more clicks remaining to complete the cPanel installation.
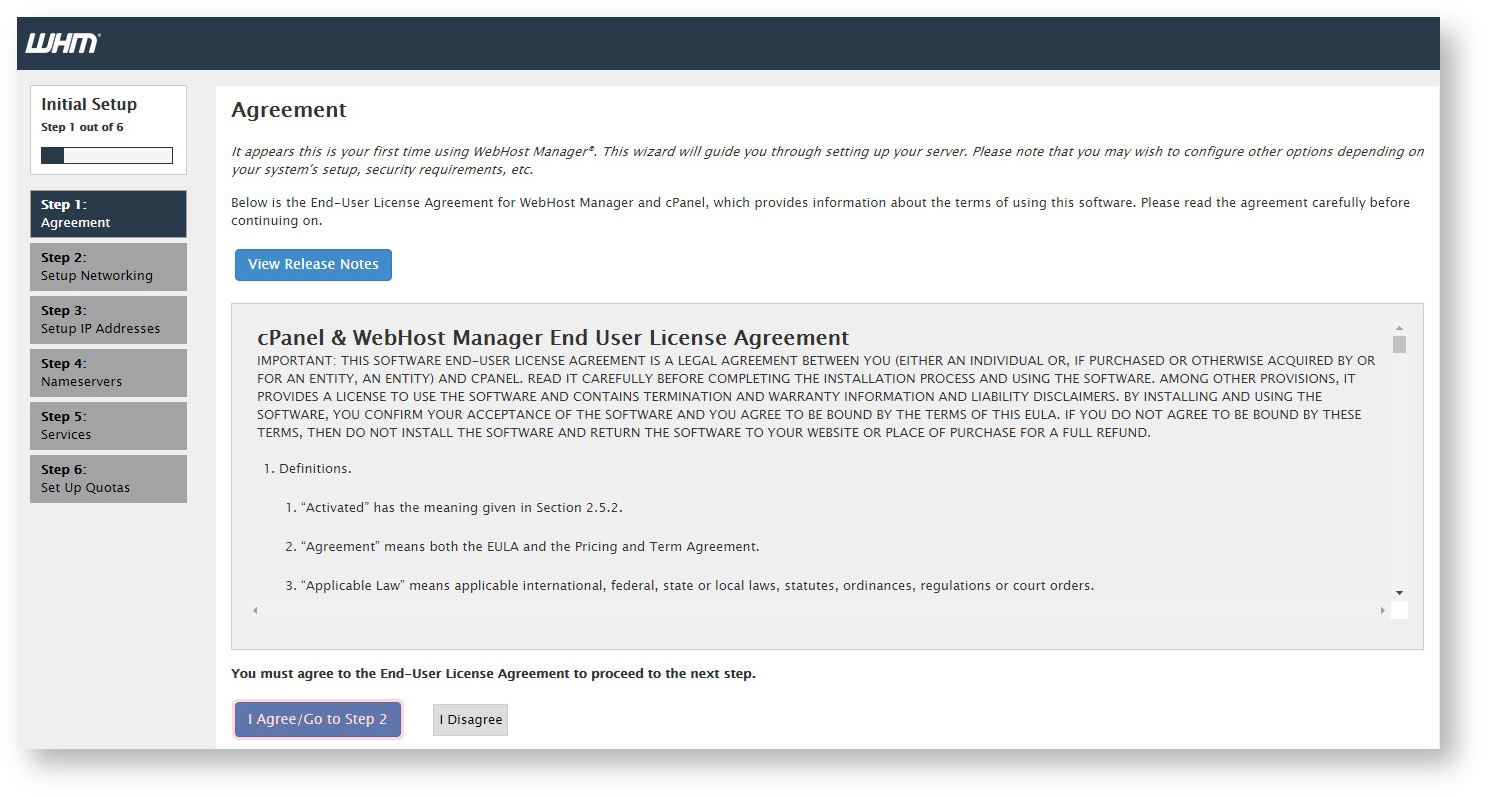
Once you are logged in you will be taken to the initial server setup. In Step 1 you will be shown the cPanel & Web Host Manager End User License Agreement, you can go through the agreement and click on I Agree/Go to Step 2 once you are ready.
In Step 2 you will be taken to the Setup Networking section. Provide your contact information, a valid email address that should not be hosted on the same server. This email will be used for sending critical information about the server.
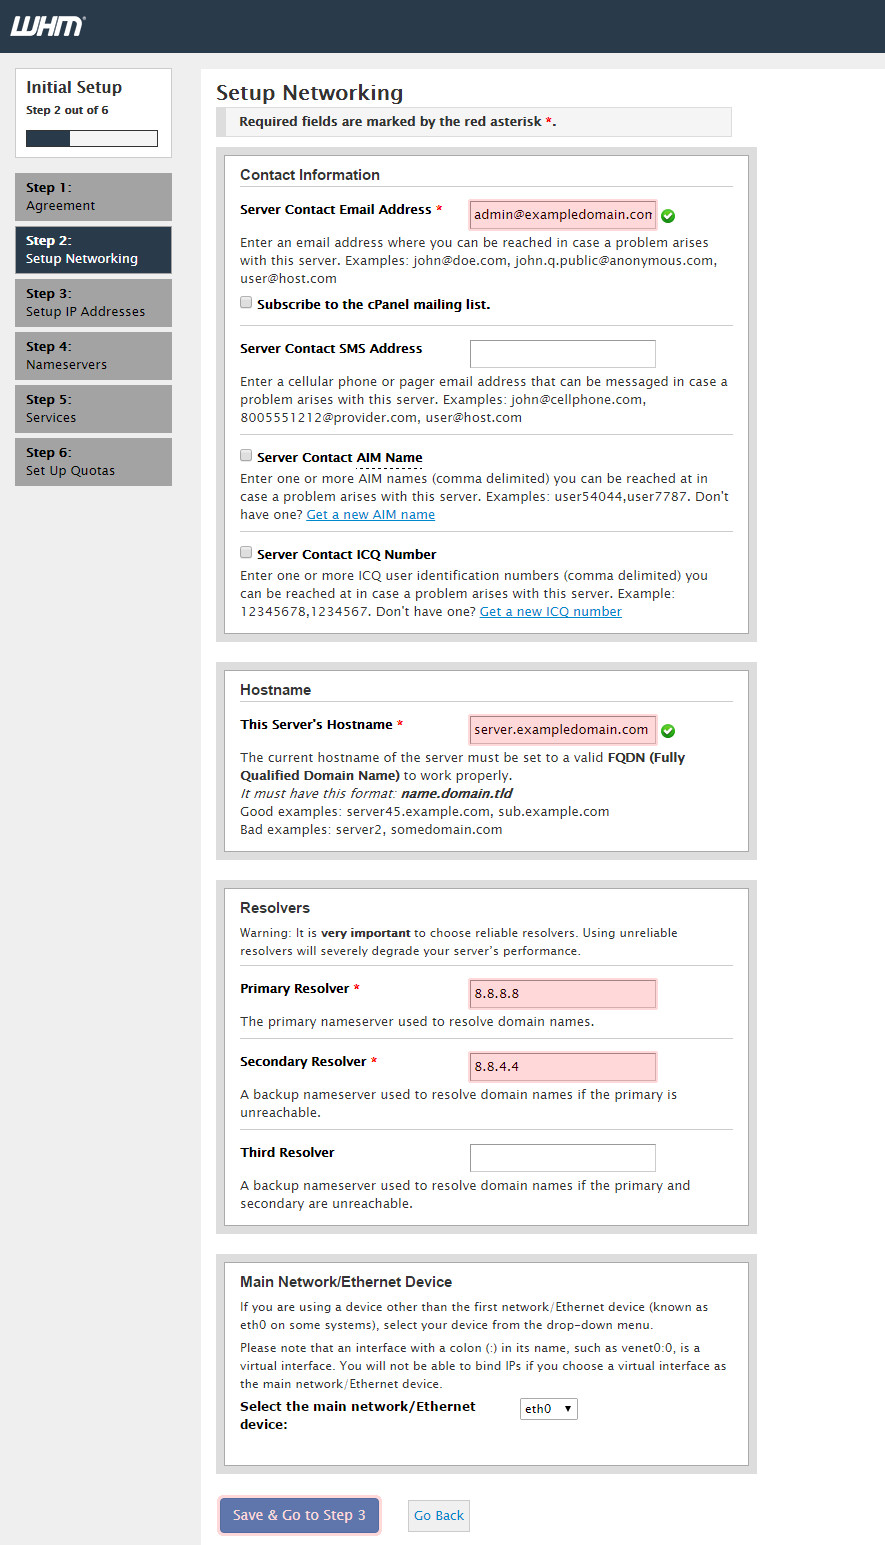
Scroll down to find the hostname section, you can enter a new hostname for your server by replacing the old one which we have given during installation. If you don’t want to change the hostname, you can leave the hostname field as it is. Enter DNS resolvers for your server. Resolvers will be used to fetch DNS entries of any website. If your service provider has DNS resolvers then cPanel will automatically detect and fill them for you, if not then you can use Google’s public DNS resolvers which are 8.8.8.8 and 8.8.4.4.
Next you can select your Main Network Device, an IP available on that device will be considered as the main IP address of your server.
Once done click on Save & Go to Step 3 button.
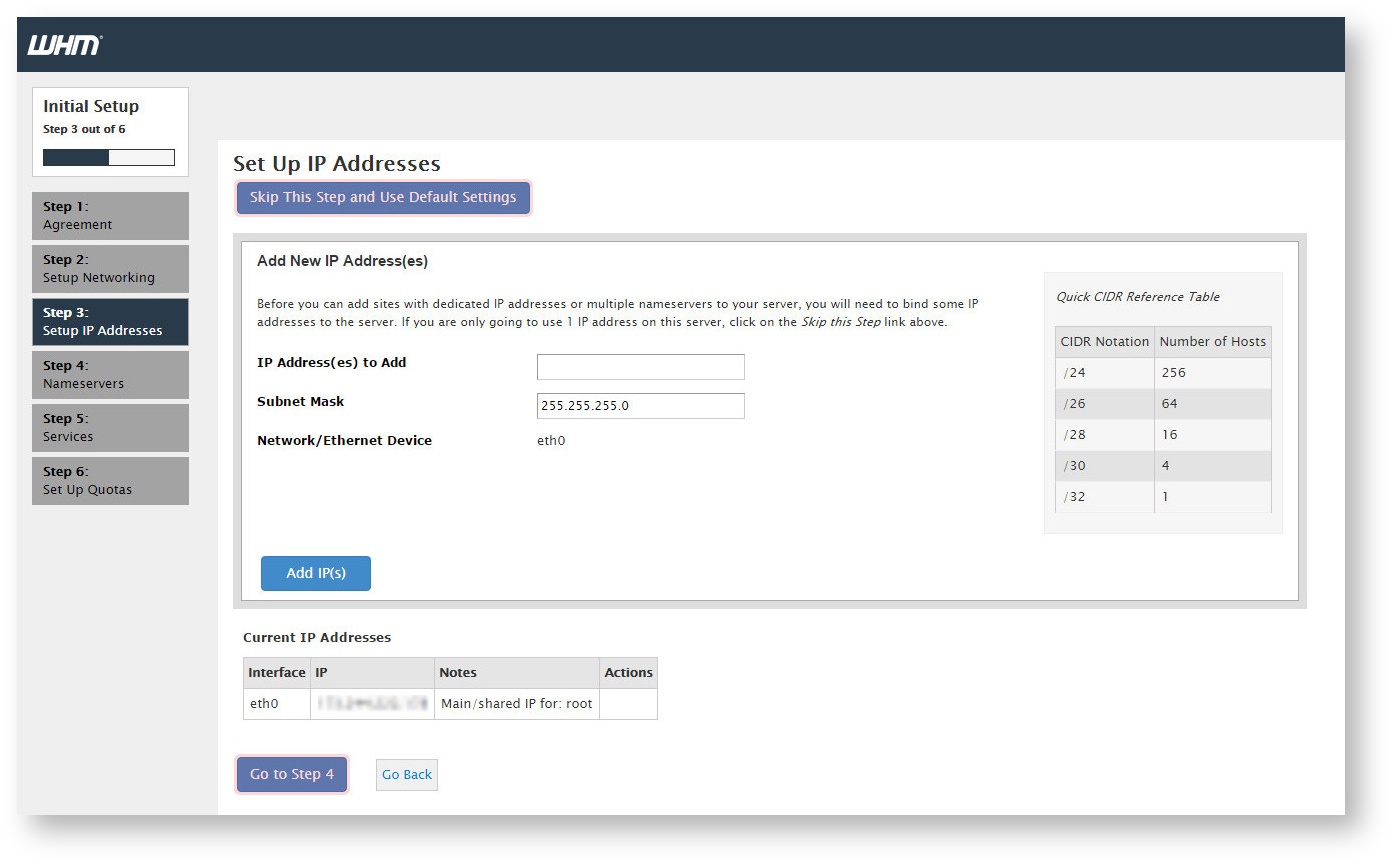
In Step 3 you will see the section to Set Up IP Addresses. If you have more than one IP address assigned to your server and your interface, you can add them here. To add a new IP address just enter the IP address in IP Address(es) to Add field, if you have a pool of IP addresses you can also add multiple IP addresses using CIDR notations. Enter the Subnet Mask and choose the network interface. Click on Add IP(s) button to add the IP address. Down below you will see the list of current IP addresses available to your server.
If you wish to use the default settings just click on Skip This Step and Use the Default Settings button on the top. If you have added IP address then click on Go to Step 4 button.
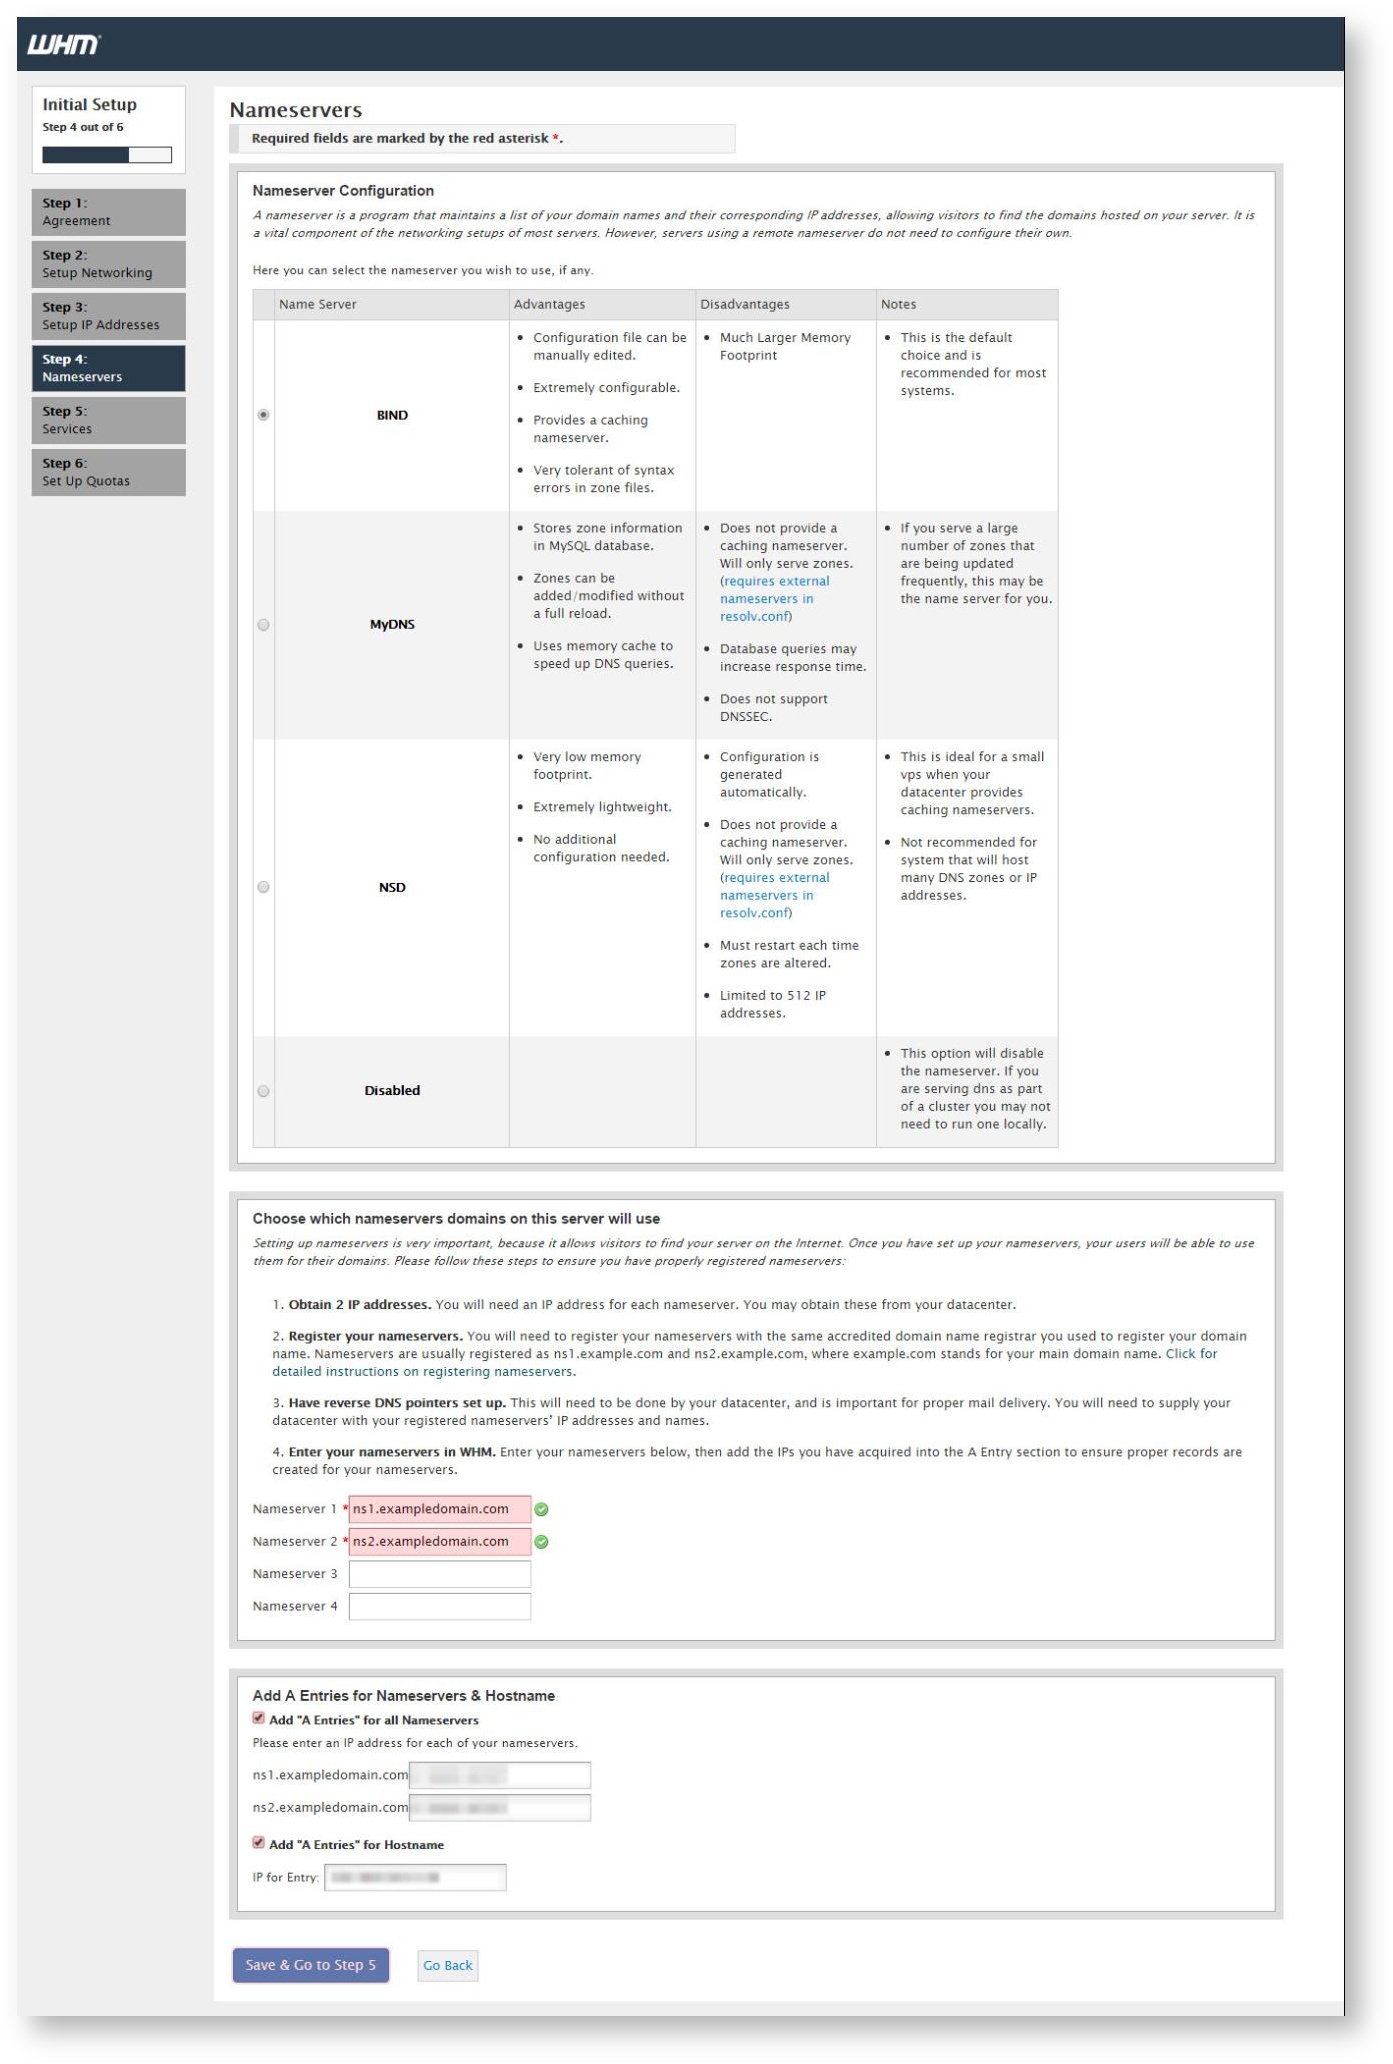
Next, choose the nameserver which your server will use. You may want it to be ns1.yourdomain.com or ns2.yourdomain.com. You will need to create hostnames in your domain control panel. Now add A Entries for your hostname by selecting the Add “A Entries” for Hostname checkbox.
Enter the IP address of your server if it is not prefilled. Finally, click on Save & Go to Step 5 button to go to step 5.

In Step 5 You will see the configuration page for your services. In FTP configuration you can choose from two FTP applications, recommended is Pure-FTPD. Choose the disabled option if you want to disable the local FTP server. In mail configuration you can either choose Dovecot which is also recommended or you can choose to disable mail server by choosing disabled option.
Next you can configure cPHulk Brute Force Protection, select Enable cPHulk check box to enable cPHulk. Next you can select settings for cPHulk from many options. In Advanced setting of cPHulk you can choose duration to block a user from logging in if it encounters certain failures by Account and IP address.
You can also provide maximum failures before an IP address is blocked for a day. Finally click on Save & Go to Step 6 button.
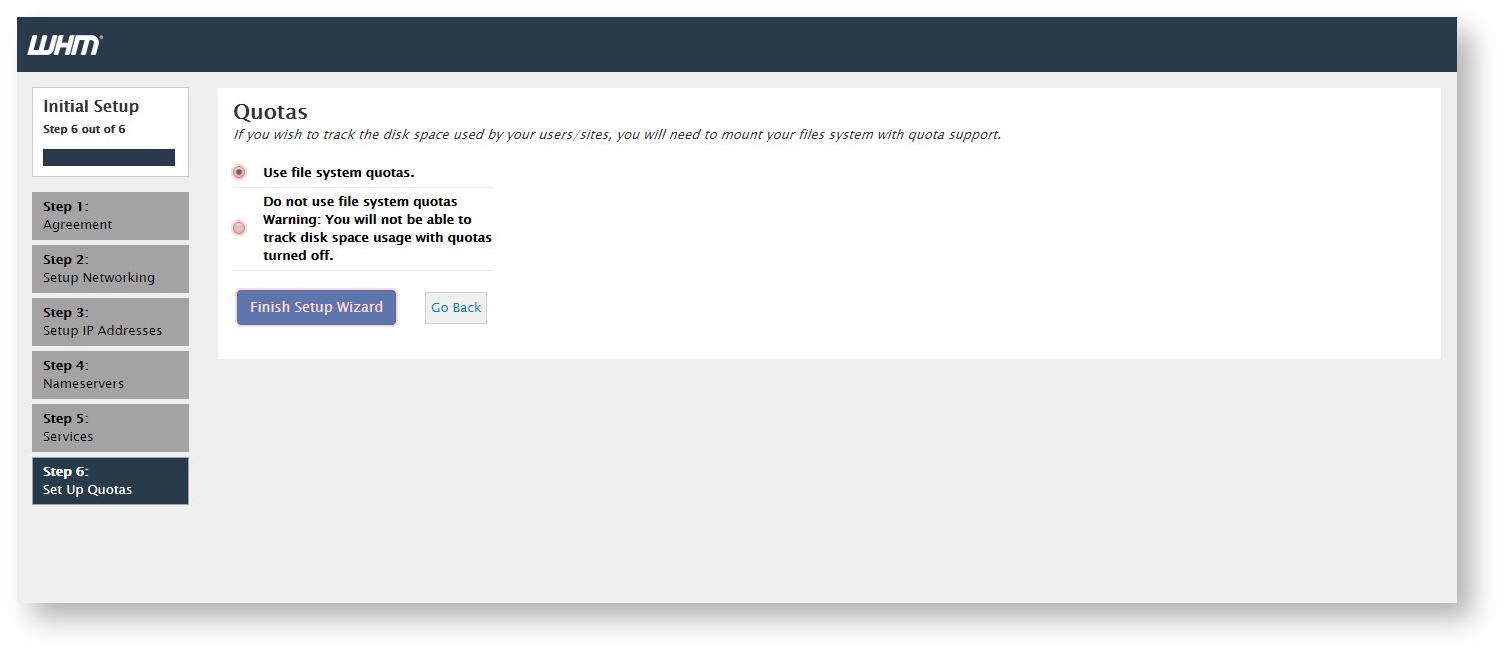
In Step 6 you will be asked if you want to use file system quotas. It is recommended that you select Use file system quotas options. If you choose not to use file system quotas then you will not be able to track the disk space used by any user or website.
Click Finish Setup Wizard to complete the initial setup wizard. You will now see some new features of cPanel in its feature showcase. In recommended features you will see cPanelID, which enables a user to login to cPanel with his cPanelID. This feature enables a user to login to multiple cPanels with single user id. You can enable this feature by choosing the enable option. To disable this, select No, thank you option.
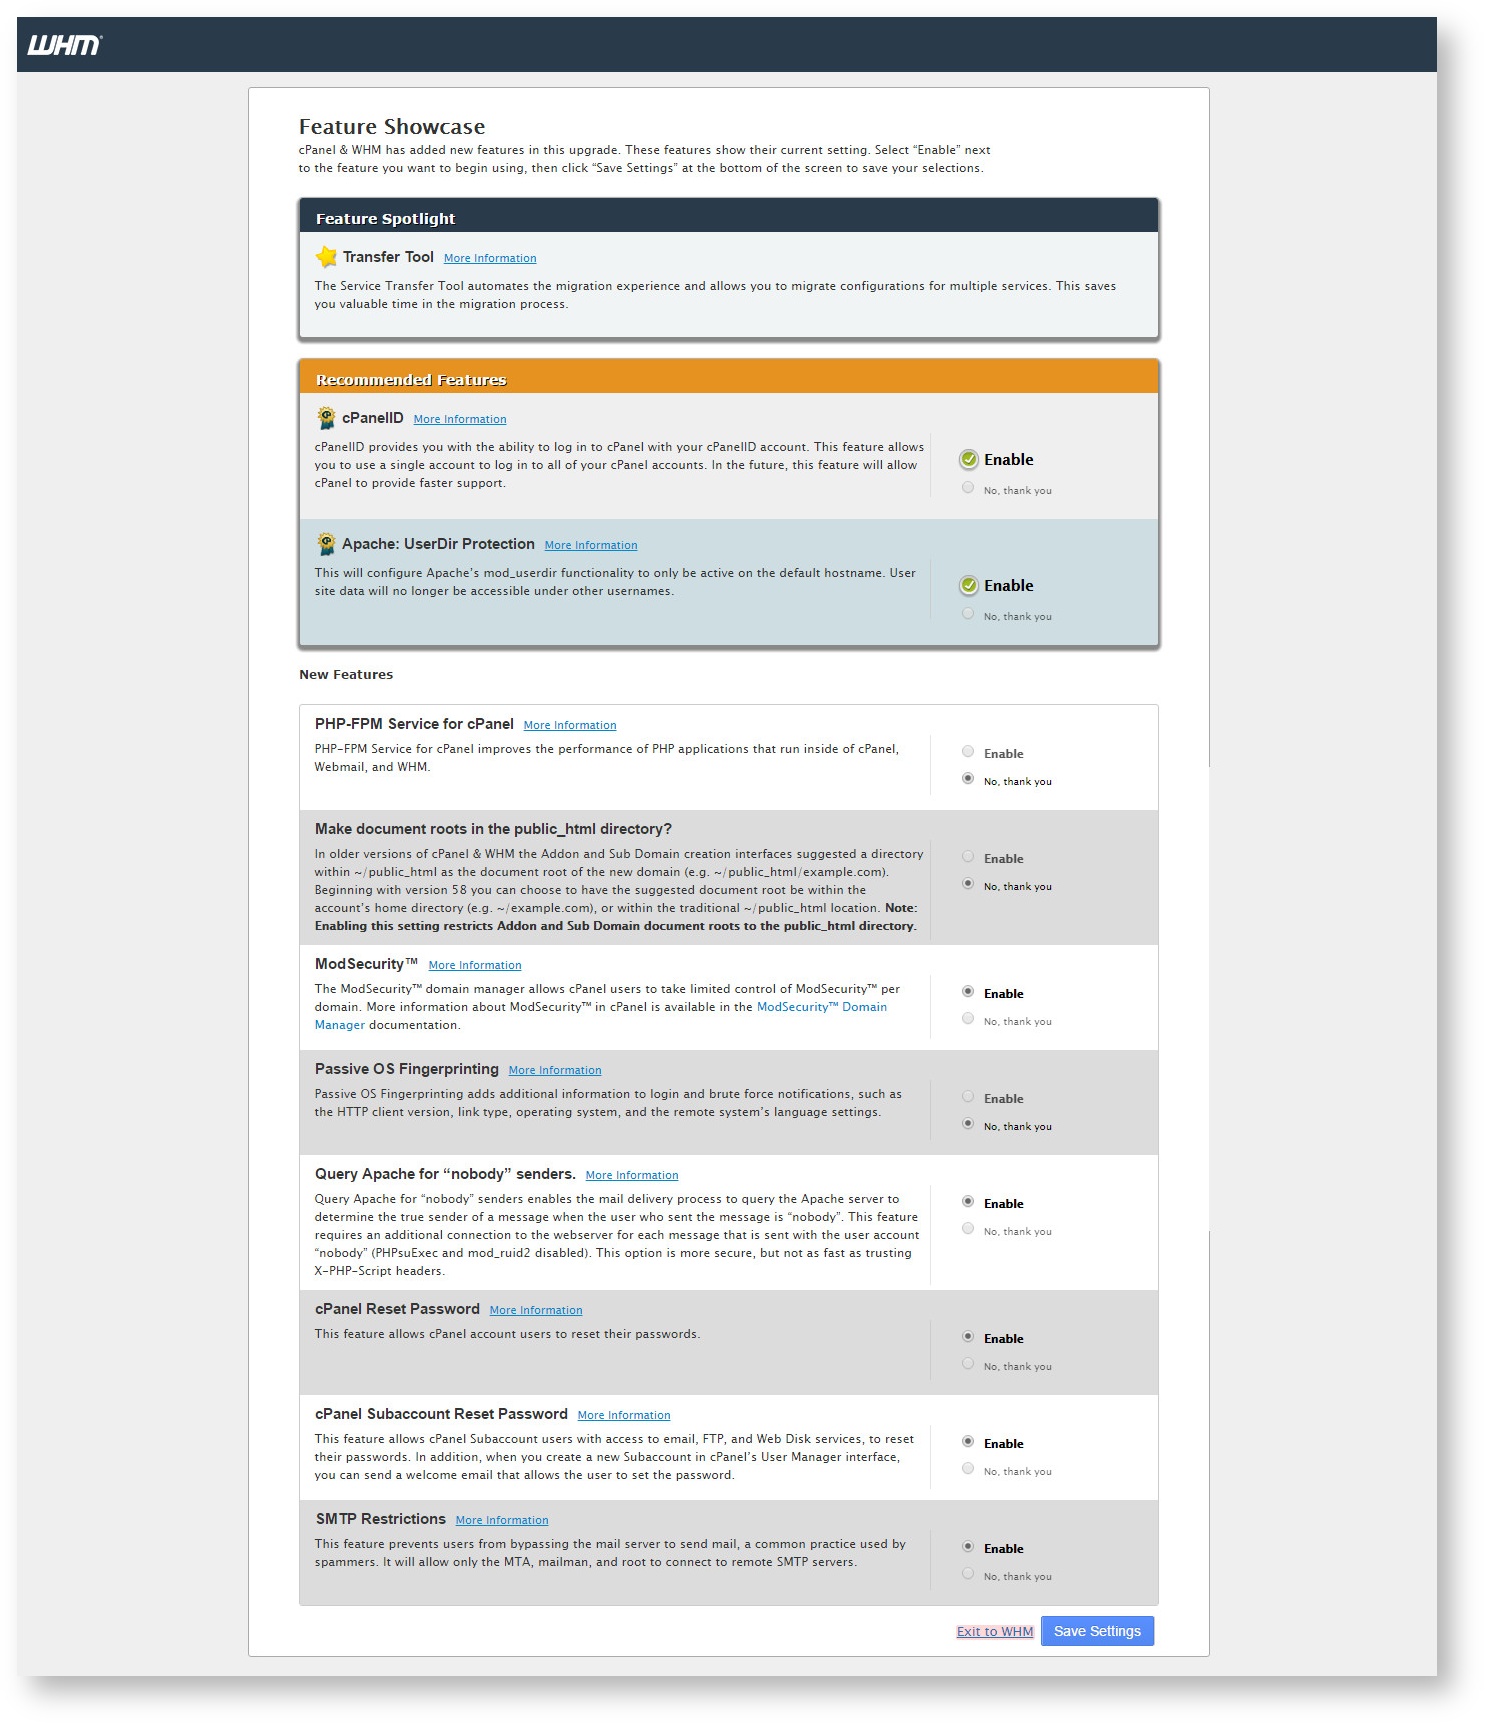
Next, you will see cPHulk’s username based protection feature which only blocks a certain user instead of blocking the IP address so that other user may login from same IP. There are more new features like PHP-FPM, ModSecurity, cPanel Reset Password and more. You can either choose to enable them or disable them by selecting No, thank you option.
Once you have chosen to enable or disable a feature. Click on Save Settings button to save the settings and go to WHM.
You will now see the default home page of WHM.
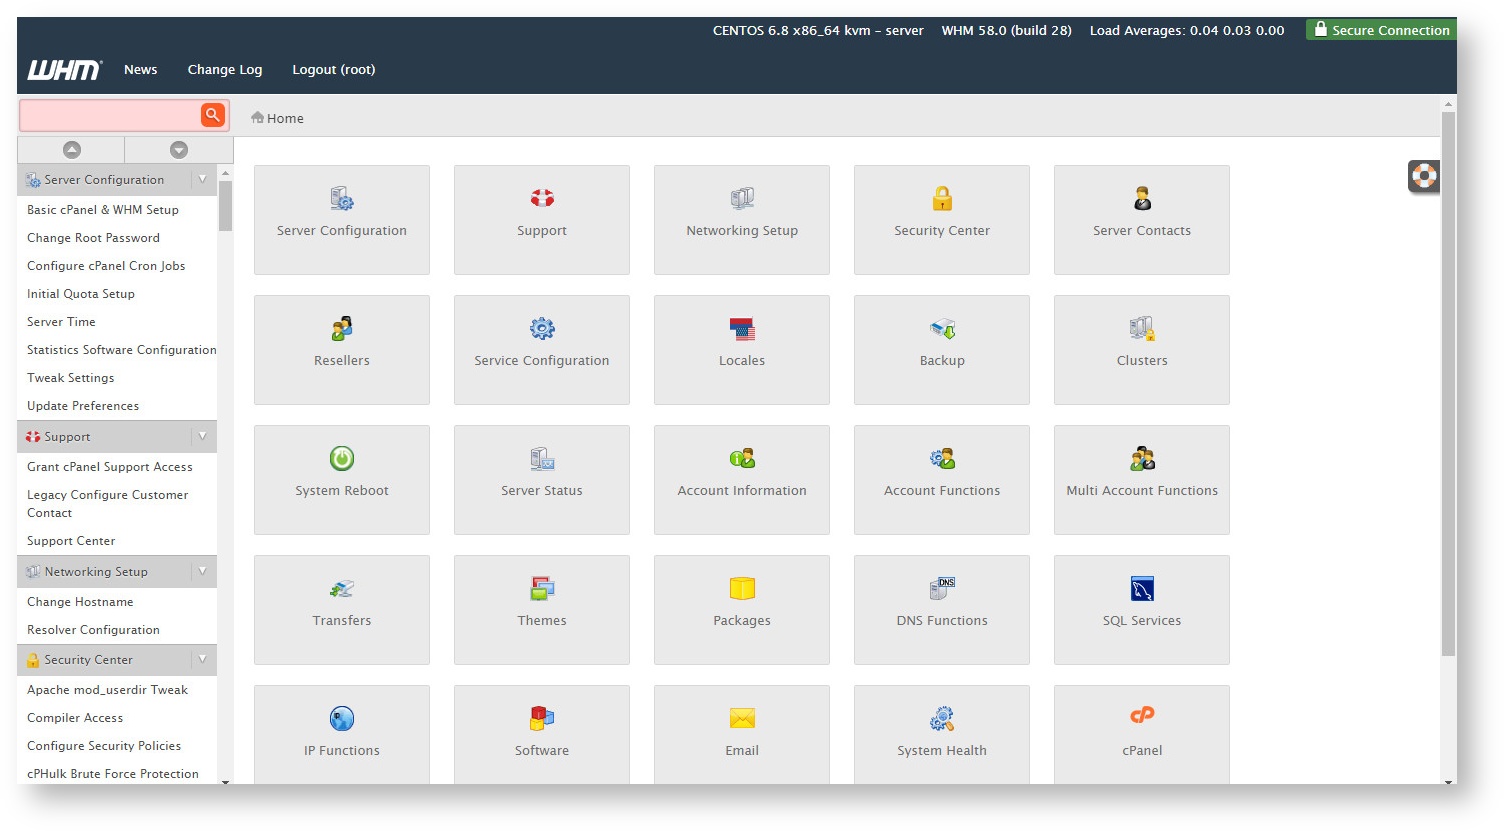
There are many options available in WHM. Each is organized under various categories and menus. The search box in the top-left of the screen can help you quickly find a specific menu that you’re looking for.
Verifying your license
Once installed, you should be good to go for the 15 day trial period. Once that expires, you have no choice but to purchase and verify a license. Once you’ve purchased your license, the license verification process isn’t nearly as simple as it should be. Point your browser to verify.cpanel.net, enter your server’s public IP address, and click Verify License. If the server is licensed, go back to the terminal window and issue the command (as root):
/usr/local/cpanel/cpkeyclt
The above command will update the license on the server and you are good to start managing your server with cPanel.
Basic Configuration Setup Which Is Good For A Hosting Server
- Stay up-to-date
If you don’t upgrade your cPanel to the latest version, the vulnerabilities increase. Therefore, make sure you have the latest version in-line.
WHM > cPanel > Upgrade to Latest Version
- Config Server Firewall
ConfigServer Firewall, also known as CSF, is a firewall configuration script created to provide better security for your server while giving you an easy to use, an advanced interface for managing your firewall settings. ConfigServer Firewall also comes with a service called Login Failure Daemon, or LFD. LFD watches your user activity for excessive login failures which are commonly seen during brute force attacks. If a large number of login failures are seen coming from the same IP address, that IP will immediately be temporarily blocked from all services on your server.
CSF can be installed form https://download.configserver.com/csf.tgz
- ModSecurity
ModSecurity (aka mod_security, security2_module, or modsec) is an apache module designed to work similarly to a Web Application Firewall. ModSecurity is a very efficient and widely used tool used in most of the cPanel servers for intrusion detection and prevention. It also offers protection to a wide range of attacks. The way in which ModSecurity operates is that we set a list of rules.
You can install ModSecurity via cPanel/WHM’s Easyapache tool.
- ConfigServer ModSecurity Control (cmc)
The ConfigServer ModSecurity Control(CMC) is another useful feature in which we can manage mod_security rules and configuration from within the WHM panel. CMC is a free add-on product for cPanel which provides user-friendly web-interface for managing mod_security. Through this mod-security addon we can enable or disable mod-security for a particular cPanel account or we can disable any individual rules on per account or per domain basis.
- ConfigServer exploit scanner (CXS)
The eXploit Scanner is the best tool out there for detecting malicious code on the server and for real-time detection while files are uploaded to the server.
- Securing SSH
SSH/Shell is the remote connectivity tool in Linux with which users can connect to the server remotely. It is important to secure SSH/Shell for restricting the attacks through it.
- Use of Custom Port
- Alwaysuse SSHv2 only
- Setup wheel user
- Key based password less login
- Disable Anonymous FTP
The risk in leaving Anonymous FTP open is that a hacker will be able to upload content to gain access to your account. By disabling Anonymous FTP and specifying SSL for access, you move two steps closer to proper security.
- Enable backup
This is advised as a best practice in case your content needs to be replaced or restored.
- Enable cPHulk Brute Force Protection
Enable the cPHulk protection on the server to protect from DDoS like attacks.
- Enable Shell Fork Bomb Protection
Fork Bomb Protection denies users who have terminal access (SSH/Telnet) the ability to use all of the resources on the server. To prevent server crashes, do not allow unlimited resource allocation.
- Harden /tmp partition
Securing or hardening tmp involves a large role in securing your server from external attacks. All applications use /tmp directory to store the data temporarily. Use a separate /tmp partition that you mount with noexec and nosuid option. This option forces a process to run with the privileges of its executor.
Run the /scripts/securetmp script to mount your /tmp partition to a temporary file for extra security.
- PHP Disable_function
For security reasons, you may want to disable certain PHP functions. For example, the exec and system functions are particularly dangerous when they are used with unsanitized input values.
system, exec, shell_exec, passthru, phpinfo, show_source, popen, proc_open, show_source, symlink, dl, escapeshellarg, escapeshellcmd
- Install tmpwatch
Tmpwatch recursively removes files which haven’t been accessed for a given time. Normally, it’s used to clean up directories which are used for temporary holding space such as /tmp.
- Install ClamAV Scanner
The Clam AntiVirus Scanner (ClamAV) antivirus software searches your server for malicious programs. If the scanner identifies a potential security threat, it flags the file to allow you to take the appropriate action.
- Restrict System’s Compilers
Most users do not require the use of C and C++ compilers. We strongly recommend that you disable compilers for all users who do not exist in the compilers group in the /etc/group file.
- Disable unused services and daemons
Any service or daemon that allows connections to your server may also allow hackers to gain access. To reduce security risks, disable all services and daemons that you do not use.
- Control access to services by IP Address
You can use WHM’s Host Access Control interface (WHM Home >> Security Center >> Host Access Control) to allow only certain IP addresses to access certain services on the server:
Best WHM Tweak settings (Home > Server Configuration > Tweak Settings)
- catch-all/default address behaviorto “fail
Setting the catch-all/default address behavior to “fail” will cause mail sent from non-existing addresses to your domains to be rejected by default by the server. This is generally preferred as it will reduce server load due to attacks from spammers.
- Turn on Use cPanel® jailshell by default
For accounts that you choose to grant shell access to, this option will make the default settings grant a jailed shell account instead of the normal shell account for that user.
- Enable SPFon domains for newly created accounts
SPF (Sender Policy Framework) denies spammers the ability to send email when they forge your domain’s name as the sender (spoofing).
- Enable DKIMon domains for newly created accounts
DKIM (DomainKeys Identified Mail) verifies a message’s sender and integrity. It allows an email system to prove that a message is valid, not forged, and that it came from the specified domain.
- Turn Off Allow Remote Domains
Enabling this option allows users to create parked domains (aliases) and addon domains that resolve to other servers.
- Enable BoxTrapper spam trap
This setting allows you to enable BoxTrapper, a spam prevention system that uses blacklists, whitelists, and ignore lists, and an automated response-verification system.
- Enable Apache SpamAssassin™spam filter
Apache SpamAssassin, a spam filtration program that scores incoming email and checks that score against a predefined limit and blocks spam being reaching the user inbox.
- Enable Apache SpamAssassin™Spam Box delivery for messages marked as spam
This setting enables Apache SpamAssassin’s spam box feature. The spam box receives incoming mail that Apache SpamAssassin marks as spam.
Now you have a cPanel installed server with all basic security.